Table of Contents
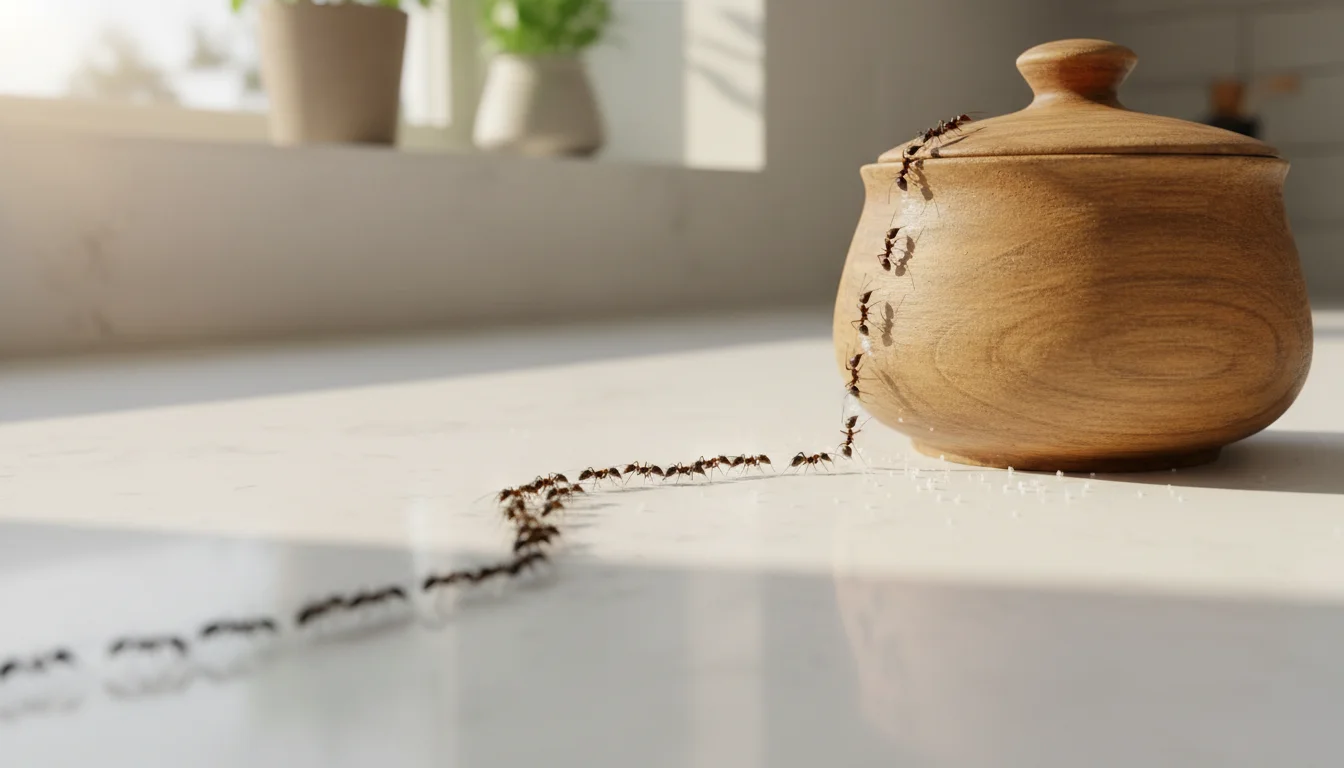
An ant trail across your kitchen counter is more than annoying – it’s a signal that a colony has identified your house as a reliable food and water source. The ants you see represent a fraction of the problem; the real issue is the nest hidden in your walls, foundation, or yard. Getting rid of ants in house requires targeting the entire colony while eliminating the conditions that attracted them. The methods below address both immediate removal and long-term prevention, from baiting systems that poison the nest to structural repairs that block future invasions.
1. Identify the Ant Species
Different ant species require different treatments. Carpenter ants need wood-destroying colony elimination, while odorous house ants respond to standard baits. Sugar ants seek carbohydrates, but protein-feeding species ignore sweet baits entirely. Collect a specimen in a sealed bag and compare it to online identification guides, or snap a close-up photo for a university extension service. Misidentifying the species wastes time on ineffective treatments. Pavement ants nest in foundation cracks; pharaoh ants split into multiple colonies when threatened by sprays.
2. Deploy Bait Stations and Gel
Bait is the only method that kills the colony rather than just the foragers you see. Place bait stations along ant trails, near entry points, and in corners where activity concentrates. Worker ants carry poisoned bait back to the nest, feeding it to larvae and the queen. Gel baits work faster than granules because ants consume them immediately. Avoid spraying pesticides near bait stations – it kills foragers before they can transport poison home. Replace baits every two weeks even if they look untouched; the active ingredient degrades. Expect two to four weeks before seeing full colony collapse.
3. Monitor Activity Patiently
Ant colonies don’t disappear overnight. After placing baits, you’ll often see activity increase for the first few days as more workers are recruited to the poison source. This is normal and actually means the bait is working. Resist the urge to spray visible ants or move bait stations around. The colony needs time to consume enough bait to kill the queen and brood. Mark the calendar two weeks out and don’t panic if you still see ants during that window. If activity remains constant after three weeks, the bait type is wrong or the nest is inaccessible. But if you wipe out the foragers before they finish poisoning the colony, you reset the clock to zero.
4. Replace Baits Every 3 Months
Even after the infestation clears, keep bait stations active as a monitoring system. Ants scout continuously, and a fresh colony can move in within weeks of your victory. The active ingredients in bait degrade from heat, humidity, and UV exposure, turning stations into useless plastic shells. Swap them out every three months regardless of visible activity. This maintenance schedule catches new colonies when they’re small – a dozen ants instead of a thousand. Mark replacement dates on your calendar or set a recurring phone reminder. Stations hidden under sinks or in crawl spaces are easy to forget until you’ve got another full-blown infestation.
5. Try Different Bait Types if Ineffective
Ant dietary preferences shift seasonally and by species. A colony ignoring sweet gel bait might swarm protein-based granules. If you see no reduction in activity after two weeks, switch bait formulations. Terro liquid baits work for sugar-feeding ants; Advion gel targets protein-seekers. Some species prefer solid bait stations over liquids. Carpenter ants often need protein baits in spring and sugar baits in summer. If three different bait types all fail, you’re either dealing with a species that won’t take bait (like pharaoh ants, which need professional treatment) or the colony is so established that baiting alone won’t cut it. That’s when you add barrier treatments or call in reinforcements.
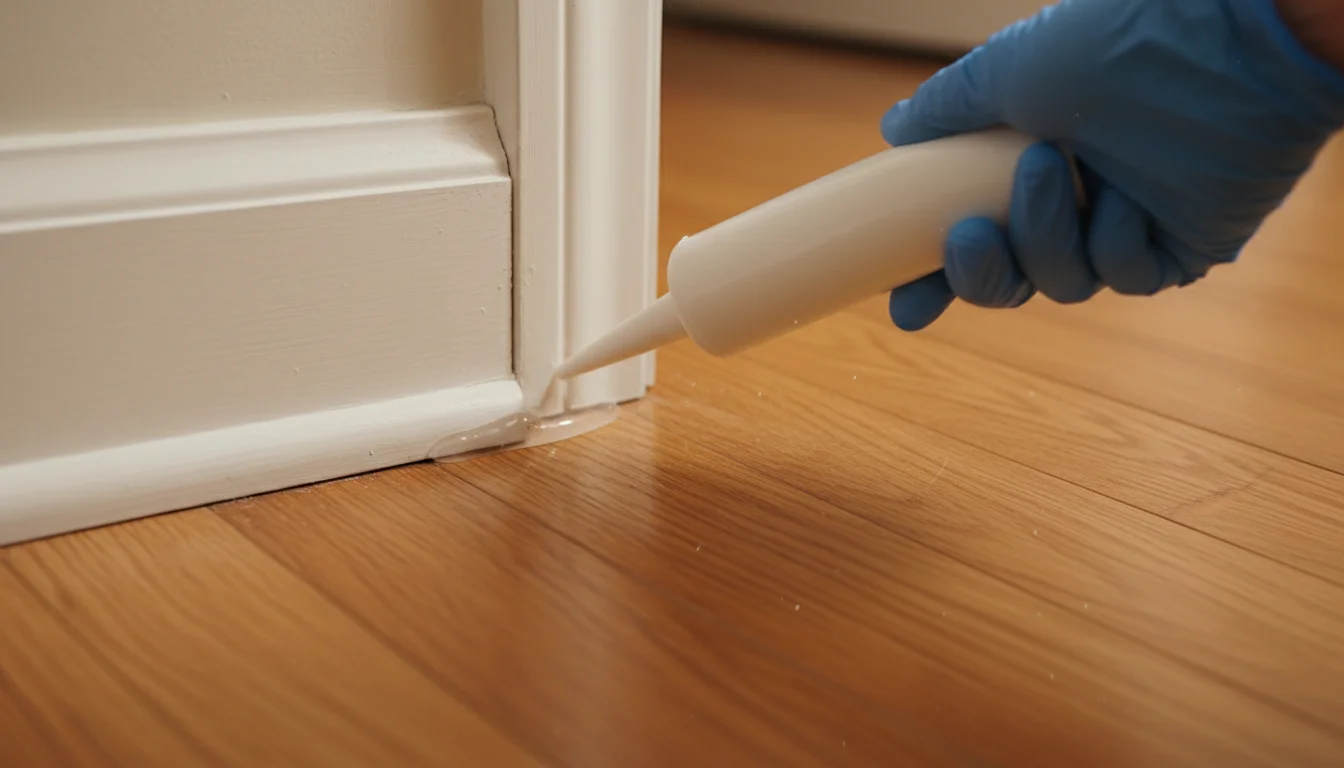
6. Seal Foundation Cracks and Entry Points
Ants exploit gaps smaller than a millimeter. Inspect your foundation, door frames, window sills, and utility penetrations for cracks. Use silicone caulk for stationary gaps and weatherstripping for door sweeps. Check where pipes enter the house – the space around water lines and electrical conduits often goes unsealed. Expanding foam works for larger holes, but ants can tunnel through it if you don’t trim and cover it with caulk. Pay attention to corner joints where siding meets the foundation; these separate over time and create highways straight into wall voids.
7. Apply Diatomaceous Earth Barriers
Food-grade diatomaceous earth is fossilized algae with microscopic sharp edges that shred ant exoskeletons, causing dehydration and death. Sprinkle a thin line across thresholds, along baseboards, and around appliances. It’s non-toxic to mammals but lethal to insects that crawl through it. The powder stops working when wet, so reapply after mopping or rain. Wear a dust mask during application – it’s harmless to swallow but irritating to inhale. This method works as a physical barrier rather than a poison, so ants can’t develop resistance to it.
8. Eliminate Moisture Sources and Leaks
Ants need water as much as food. Fix dripping faucets, repair pipe leaks, and address condensation from HVAC systems. Check under sinks and around toilets for hidden moisture damage – soft wood attracts carpenter ants. Basement dehumidifiers reduce ambient moisture that draws colonies indoors. Outdoor spigots should drain fully after use; even a slow drip creates an ant water station. Pet water bowls left overnight are major attractants; empty and dry them before bed. If you see ants in the bathroom, the colony is likely in the wall cavity near a plumbing leak.
9. Replace Water-Damaged Wood
Carpenter ants don’t eat wood – they excavate it to build nests, and they prefer wood that’s already soft from rot. If you’ve got water damage in your foundation, siding, or structural beams, you’re advertising free real estate to carpenter ant colonies. Probe suspect wood with a screwdriver; if it sinks in easily, that section needs replacement. Even if you don’t see ants yet, rotted wood is a ticking time bomb. Replace damaged sections with pressure-treated lumber rated for ground contact. This also applies to deck posts, porch supports, and window sills that collect rain. Fixing the leak stops new damage, but the compromised wood stays compromised until you cut it out.
10. Trim Vegetation Away from House
Tree branches, shrubs, and vines touching your house create ant highways from outdoor colonies straight to your siding. Trim branches back at least six feet from the roof and walls. Overgrown bushes against the foundation create humid microclimates that attract moisture-seeking ants and provide cover for nesting. Hedges should sit at least two feet away from exterior walls with visible airflow between. Ivy and climbing vines look great but act as ant escalators; if you keep them, inspect regularly for trail activity. Even ornamental grasses can bridge the gap if they grow tall enough to brush against siding. The goal is a clear defensive perimeter with no direct contact points.
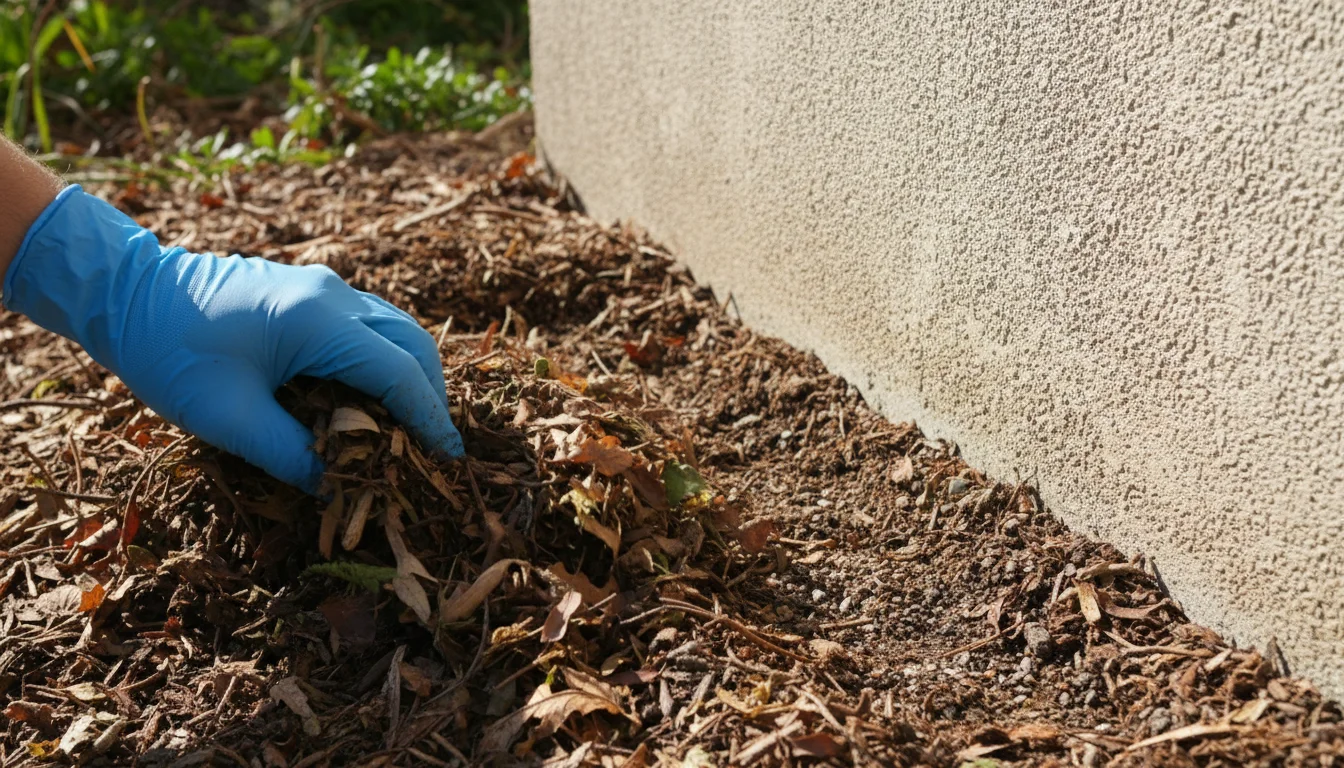
11. Remove Mulch and Debris from Foundation Perimeter
Wood mulch retains moisture and provides nesting material for pavement and carpenter ants. Create a 12-inch bare zone between mulch and your foundation. Stone or gravel works better than wood chips for landscaping near the house. Firewood stacked against siding is an open invitation; keep it at least 20 feet away and off the ground. Leaf piles, grass clippings, and yard debris create outdoor nesting sites that migrate indoors when the weather shifts. Tree branches touching your roof act as bridges; trim them back at least six feet.
12. Store Food in Airtight Containers and Clean Spills
Loose pantry items leak scent trails that recruit entire ant armies. Transfer flour, sugar, rice, cereal, and pet food into sealed plastic or glass containers. Wipe up crumbs immediately and don’t leave dirty dishes overnight. Fruit bowls should be refrigerated or covered; overripe bananas are ant magnets. Take trash out daily and use bins with tight-fitting lids. Check for forgotten food under appliances and in cabinets – a spilled bag of sugar can feed a colony for months. If you find ants in packaged food, discard it in an outdoor bin; trying to salvage it spreads the infestation.
13. Discard Contaminated Foods
Once ants find an open food package, that food is done. You might only see a few ants on the surface, but the colony has already marked it with pheromones and recruited workers to haul it away grain by grain. Trying to pick out the ants and save the cereal just spreads contamination and leaves scent trails for the next wave. Bag the entire package, seal it, and throw it directly into your outdoor trash bin. Don’t dump it in your kitchen garbage can – that just relocates the problem three feet. Check surrounding packages for holes or trails; ants can chew through cardboard and thin plastic. If infestation is widespread in your pantry, you might need to purge everything opened in the past month.
14. Store Birdseed in Sealed Containers
Birdseed and wild animal feed stored in garages or sheds are ant magnets. The bags are designed for retail display, not pest prevention, and ants chew through paper and thin plastic easily. Transfer birdseed into heavy-duty plastic bins with locking lids or metal trash cans. If you’re storing 50-pound bags, get a bin that fits the whole bag rather than leaving it folded open. Ants will build nests directly in loose seed if given the chance, contaminating the entire supply. This applies to chicken feed, rabbit pellets, and any other bulk grain products. Once ants claim a food source this rich, they’ll defend it aggressively and establish satellite colonies nearby.
15. Remove Pet Food Bowls Daily
Leaving pet food and water bowls out overnight is equivalent to running an ant buffet. Dry kibble seems less attractive than human food, but ants will swarm it if nothing better is available. Wet food is instant colony recruitment. Feed pets on a schedule, then pick up bowls and wash them immediately after meals. If your pet grazes throughout the day, use elevated bowl stands with moats – small trays filled with soapy water that create an impassable barrier. Water bowls are just as bad as food bowls; ants need hydration and a constantly refilled dish is perfect. If you can’t eliminate bowls entirely, move them to a tiled area that’s easy to wipe down and keep them on a shallow tray that catches spills.
16. Disrupt Trails with Vinegar Spray
White vinegar erases the pheromone trails ants use to navigate between nest and food source. Mix equal parts vinegar and water in a spray bottle, then saturate ant trails and entry points. This doesn’t kill the colony but breaks the recruitment chain, causing disorientation. Reapply every few hours until activity stops. The smell dissipates quickly for humans but lingers for ants. Vinegar also works as a general cleaner that removes food residue attracting scouts. Combine this with baiting for faster results – vinegar disrupts the trail while poison eliminates the nest.
17. Treat in Late Winter or Spring Preventively
Ant colonies are smallest and most vulnerable in early spring when they’re just emerging from winter dormancy. This is when a single bait station can wipe out a colony that would take five stations to kill in summer. Apply perimeter treatments in March or April before you see indoor activity. Set outdoor bait stations around your foundation and along common entry points. This intercepts scouting parties before they establish trails into your house. Fall treatments are less effective because colonies are at peak population and already stocked with food for winter. If you’re dealing with recurring infestations every summer, the solution is hitting them in spring before they build momentum.
18. Hire Professional Pest Control
If you’ve baited, sealed, and cleaned for six weeks with no reduction in activity, the colony is either inaccessible or you’re dealing with a species that needs specialized treatment. Professional exterminators have access to stronger pesticides, can treat wall voids with dust or foam, and identify species you can’t. Carpenter ant colonies inside structural wood require drilling and injection that’s beyond DIY scope. Pharaoh ants split into multiple colonies when threatened, making them nearly impossible to eliminate without coordinated baiting across the entire structure. Some pros offer warranties; if ants return within 90 days, they retreat for free. The cost is $150-$400 for initial treatment. If the infestation is severe or you’re losing sleep over it, calling in a professional is the efficient choice.
Getting rid of ants in house is a war of attrition against a colony that can contain thousands of workers. Baiting targets the source, structural repairs block reinforcements, and sanitation removes their motivation. Most infestations clear within a month if you maintain pressure across all methods. If the problem persists despite consistent effort, the nest may be inside a wall cavity that requires professional treatment.