Table of Contents
Selling your iPad? Handing it off to a relative? Everything you’ve ever done on that thing is still sitting there. Your emails, your photos, your saved passwords, your browsing history (all of it). A factory reset alone won’t cut it if you skip the important steps beforehand. Apple buries these options across multiple menus, so here’s the full process from backup to blank slate.
1. Back Up Your Data First
Don’t skip this. Open Settings, tap your name at the top, then iCloud, then iCloud Backup, and hit Back Up Now. If you’d rather use a computer, connect via USB and use Finder (macOS Catalina or later) or iTunes (Windows or older macOS). A full backup takes 5-20 minutes depending on how much you’ve hoarded.
2. Sign Out of iCloud
This is the step most people forget, and it’s the one that actually matters. Go to Settings, tap your name at the top, scroll all the way down, and tap Sign Out. Enter your Apple ID password when prompted. The iPad will ask if you want to keep a copy of your data on the device. Say no. You’ve already backed up.
Skipping this means the next owner gets locked out by Activation Lock. Or worse, your iCloud data keeps syncing to a device you no longer own.
3. Turn Off Find My iPad
Usually handled when you sign out of iCloud, but verify it. Settings, tap your name, Find My, Find My iPad. Toggle it off. If this stays on, the iPad is bricked for whoever gets it next. They’ll hit an Activation Lock screen and have zero way past it without your credentials.

4. Deregister iMessage
If you use iMessage on this iPad, turn it off before wiping. Settings, Messages, toggle iMessage off. This unlinks your phone number and Apple ID from the iPad’s messaging. Skip this and you might miss texts that keep routing to a device you’ve already sold.
5. Remove Your SIM Card or eSIM
Got a cellular iPad? Pop the SIM tray open with a paperclip or the SIM tool that came in the box. Pull the card out. For eSIM models, you’ll get the option to erase or keep the eSIM during the factory reset process. Erase it unless you’re transferring the plan to a new device.
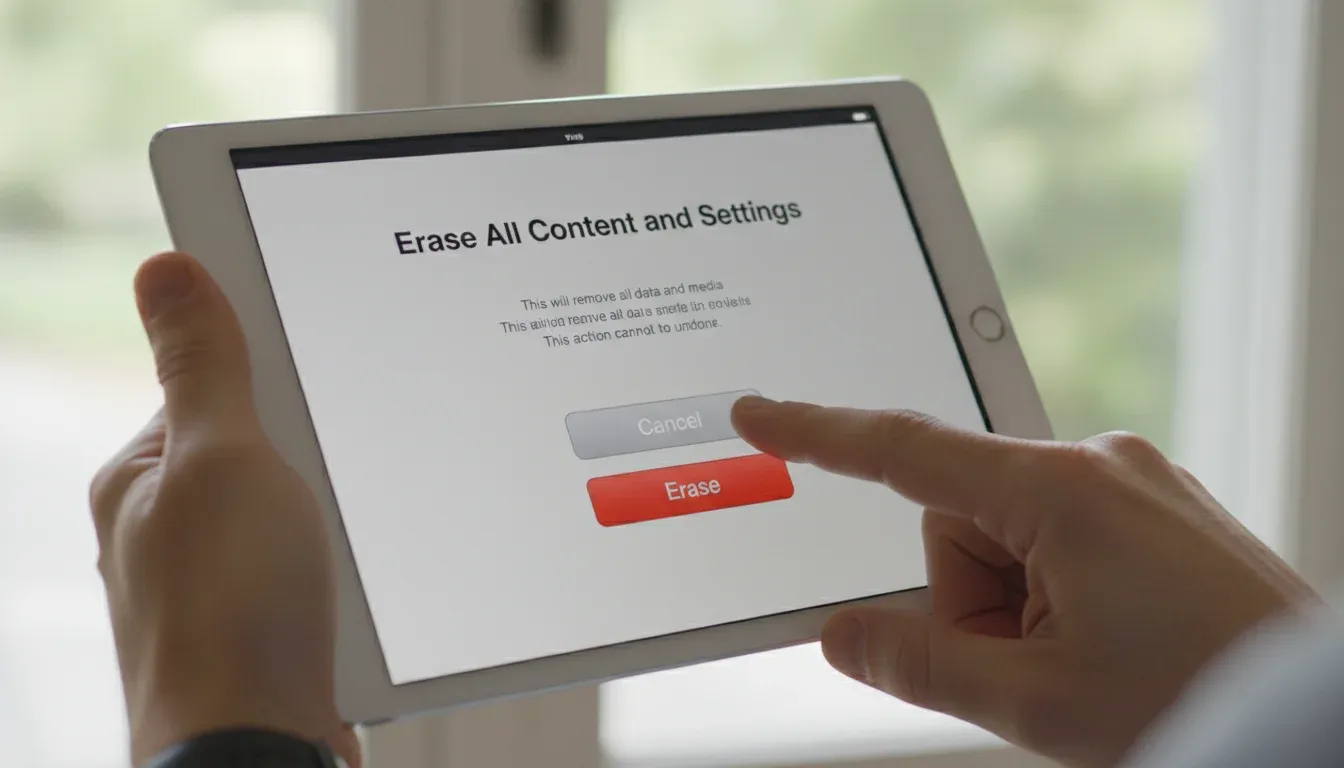
6. Erase All Content and Settings
The main event. Go to Settings, General, then scroll to the bottom and tap Transfer or Reset iPad. Tap Erase All Content and Settings. Enter your passcode and Apple ID password when asked. Confirm twice.
The Apple logo appears with a progress bar. Leave it alone. Don’t unplug it, don’t press anything. Takes a few minutes. When it’s done, the iPad restarts to the Hello screen like it just came out of the box.
One thing: make sure the battery is above 50% or keep it plugged in. If it dies mid-wipe, you’ll be dealing with a recovery mode situation.
7. Remove the iPad From Your Apple ID
Even after erasing, the iPad might still show up in your Apple ID device list. Go to appleid.apple.com on any browser, sign in, click Devices, find the iPad, and click Remove from Account. This is cleanup. It stops the ghost device from cluttering your iCloud settings.
8. Use a Computer if the iPad Won’t Cooperate
Frozen screen? Forgot your passcode? Can’t get into Settings? Connect the iPad to a computer, open Finder or iTunes, and put the iPad into recovery mode (the button combo varies by model, but it’s usually holding the top button and either Home or volume up). Click Restore when the computer detects it. This nukes everything and reinstalls iPadOS from scratch.
Factory reset done right means zero personal data left behind. Back up, sign out, erase, and double-check the device list. Takes 15 minutes and saves you from being the person who accidentally gave a stranger access to their email.